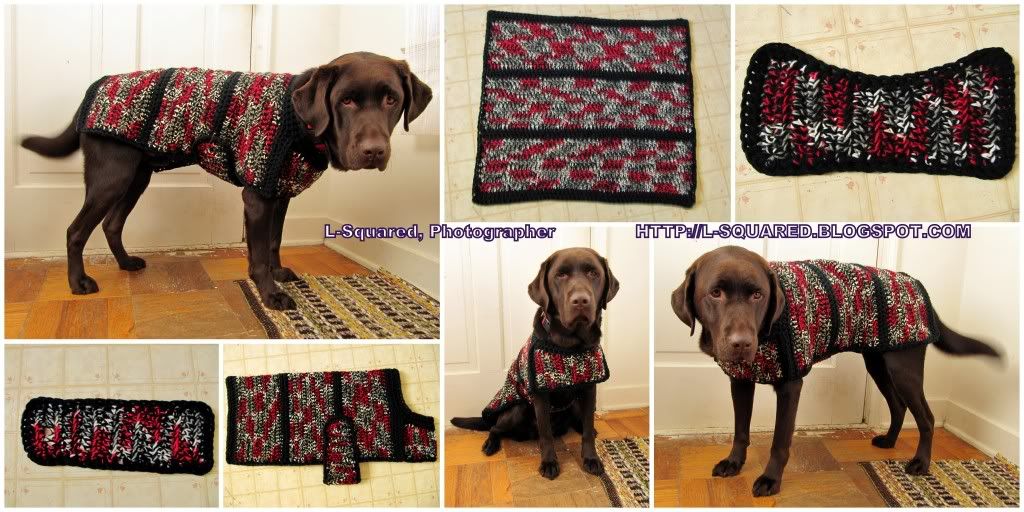
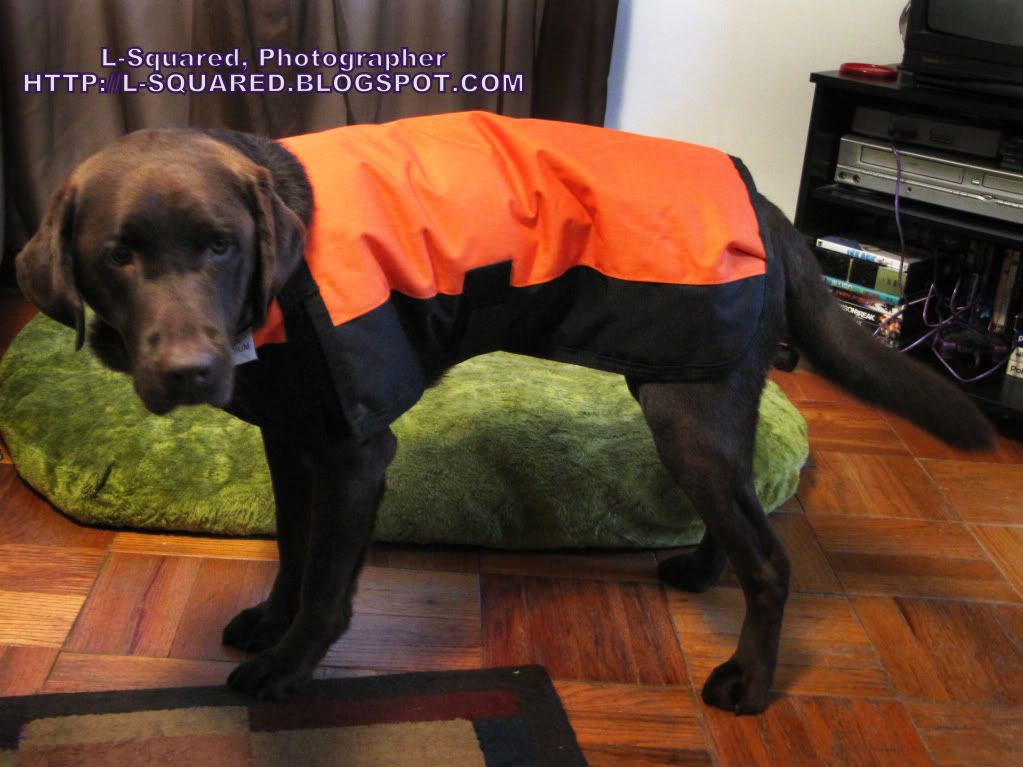
For awhile now I've been considering the idea of crocheting a sweater for my guide dog, based on the design of his winter coat. Earlier this week I finally undertook the project and I tried to take down a basic pattern for what I did, in case in anyone else wants to make a sweater-jacket like this for their dog too.
 SKILL LEVEL/RATING:
beginner/easy
MEASUREMENTS:
I designed this for my large-breed dog, but it could be made for any size/shape of dog since each section of the sweater is dependent on the specific measurements of each dog.
Before you begin, you need to carefully measure your dog:
NOTE: My pattern is just a rough guide. If your dog is not similar in size/shape to my Labrador Retriever, you will likely have to do a fair amount of customization to get the sweater to fit your dog correctly.
SUPPLIES:
Mine was approximately 8 hdc or 7 rows = 4 inches. Since this pattern is wholly dependent on the measurements of each dog, gauge isn't really important - any weight of yarn and any size hook can be used – you’ll just have to work whatever number of stitches/rows needed to achieve the correct size for your dog.
STITCH GUIDE:
st = stitch
ch = chain
sl st = slip stitch
hdc = half double crochet
NOTE: the chain 2 at the beginning of each row does NOT count as a stitch in any of the parts of this sweater.
BACK PANEL:
ch 52.
Row 1: hdc in 2nd ch from hook and in each ch across (50 st)
Row 2: ch 2 turn, hdc in each hdc across (50 st)
Row 3 – 40?: Repeat Row 2 until desired length is reached (Alternate back shaping: If I made this again I might be tempted to gradually round off the back - by decreasing at edges - after about the middle of the back rectangle, since the back of the sweater may not really need to be as wide or hang as far down on the dog’s body at the hips as it does at the shoulders)
Fasten off. (optional: I put a rim of hdc around my rectangular back panel for a more finished look, but it’s not absolutely necessary)
CHEST PANEL:
ch 13.
Row 1: hdc in 2nd ch from hook and in each ch across (11 st)
Row 2: ch 2 turn, hdc in each hdc across (11 stitches)
Row 3: turn (do not chain), sl st in 1st hdc (thereby decreasing by 1 stitch to shape for neck), hdc in next 10 hdc (10 st)
Row 4: ch 2, turn, hdc in each hdc across (10 st)
Row 5: turn (do not chain), sl st in 1st hdc (decreasing 1 stitch for neck shaping), hdc in next 9 hdc across (9 st)
Row 6: ch 2, turn, hdc in each hdc across (9 st)
Row 7: turn (do not chain), sl st in 1st hdc (decreasing 1 stitch for neck shaping), hdc in next 8 hdc across (8 st)
Row 8: ch 2, turn, hdc in each hdc across (8 st)
Row 9 & 10?: Repeat row 8. (these rows may need to be repeated more or left out all together to achieve the correct size for your dog, so be sure to keep track of your measurements)
Row 11: ch 2, turn, 2 hdc in first hdc, 1 hdc in next 7 hdc (9 st)
Row 12: ch 2, turn, hdc in each hdc across (9 stitches)
Row 13: ch 2, turn, 2 hdc in first hdc, 1 hdc in next 8 hdc (10 st)
Row 14: ch 2, turn, hdc in each hdc across (10 stitches)
Row 15: ch 2, turn, 2 hdc in first hdc, 1 hdc in next 9 hdc (11 st)
Row 14: ch 2, turn, hdc in each hdc across (11 st)
Fasten off. (optional: again I rimmed the piece in hdc for a more finished look, but it’s not necessary)
BELLY STRAP:
ch 10.
Row 1: hdc in 2nd ch from hook and across (8 st.)
Row 2: hdc in each st across (8 st)
Row 3-9?: repeat row 2 until approximately 2 inches before desired length has been reached.
Row 10: turn (do not ch), sl st in 1st hdc, hdc in next 6 hdc, sl st in last hdc (6 st)
Row 11: turn (do not ch), hdc in next 6 hdc. (6 st)
Row 12: ch 2, turn, hdc in next 6 hdc (6 st)
Row 13: ch 2, turn, hdc in next 3 hdc, ch 2 (for button hole), 1 hdc in the next 3 hdc, sl st in last hdc. (6 st)
Row 14: ch 2, turn, hdc in next 3 hdc, 2 hdc in ch-space, 1 hdc in next 3 hdc (8 st)
Fasten off (optional: once again I rimmed the piece in hdc for a more finished look, but it’s not absolutely necessary)
ASSEMBLY:
With darning needle sew wide ends of chest section onto end of back section
Sew belly section onto one side of back section, leaving space for dog's front legs in front of strap.
Sew button onto opposite side of back section – aligning it with the belly strap button hole end.
NECKLINE: (optional)
I added 2 rounds of hdc around the circle created from attaching the chest section to the back panel, so it would fit up a little closer around my dog’s neck to better keep out the cold. I found that adding some rounds in the neckline also gives the garment better structural integrity, helping to avoid over-stretching of the chest panel.
Weave in ends, and you're done!
I just took rough notes as I made the project and typed them up here, so please let me know if there are any mistakes. And if you use my pattern to make a sweater for your dog please let me know (we'd love to see pictures!). :-)

RELATED POSTS:
beginner/easy
MEASUREMENTS:
I designed this for my large-breed dog, but it could be made for any size/shape of dog since each section of the sweater is dependent on the specific measurements of each dog.
Before you begin, you need to carefully measure your dog:
- Length: base of neck to base of tail
- Width: side to side over back (to as far down as you want the sweater to hang on the dog's sides)
- Belly: side to side under dog behind front legs + at least 2” for button hole
- Chest: shoulder to shoulder above front legs
NOTE: My pattern is just a rough guide. If your dog is not similar in size/shape to my Labrador Retriever, you will likely have to do a fair amount of customization to get the sweater to fit your dog correctly.
SUPPLIES:
- Measuring Tape
- Yarn: Approximately somewhere between 650 - 1,000 yards of worsted weight yarn if you work it double-stranded like I did, if you're dog's measurements are similar to mine. I worked with a double strand of black + red/white/gray variegated yarn and worked in half-double crochets, which are thicker/fatter stitches for more warmth. However, this could easily be worked with 1 strand of any kind of yarn (which would require less) or any size of hook and your favorite stitch. You’d just have to make adjustments to the number of stitches/rows to fit your dog's measurements.
- Hook: 9.00mm (M/N)
- Darning Needle
Mine was approximately 8 hdc or 7 rows = 4 inches. Since this pattern is wholly dependent on the measurements of each dog, gauge isn't really important - any weight of yarn and any size hook can be used – you’ll just have to work whatever number of stitches/rows needed to achieve the correct size for your dog.
STITCH GUIDE:
st = stitch
ch = chain
sl st = slip stitch
hdc = half double crochet
NOTE: the chain 2 at the beginning of each row does NOT count as a stitch in any of the parts of this sweater.
BACK PANEL:
ch 52.
Row 1: hdc in 2nd ch from hook and in each ch across (50 st)
Row 2: ch 2 turn, hdc in each hdc across (50 st)
Row 3 – 40?: Repeat Row 2 until desired length is reached (Alternate back shaping: If I made this again I might be tempted to gradually round off the back - by decreasing at edges - after about the middle of the back rectangle, since the back of the sweater may not really need to be as wide or hang as far down on the dog’s body at the hips as it does at the shoulders)
Fasten off. (optional: I put a rim of hdc around my rectangular back panel for a more finished look, but it’s not absolutely necessary)
CHEST PANEL:
ch 13.
Row 1: hdc in 2nd ch from hook and in each ch across (11 st)
Row 2: ch 2 turn, hdc in each hdc across (11 stitches)
Row 3: turn (do not chain), sl st in 1st hdc (thereby decreasing by 1 stitch to shape for neck), hdc in next 10 hdc (10 st)
Row 4: ch 2, turn, hdc in each hdc across (10 st)
Row 5: turn (do not chain), sl st in 1st hdc (decreasing 1 stitch for neck shaping), hdc in next 9 hdc across (9 st)
Row 6: ch 2, turn, hdc in each hdc across (9 st)
Row 7: turn (do not chain), sl st in 1st hdc (decreasing 1 stitch for neck shaping), hdc in next 8 hdc across (8 st)
Row 8: ch 2, turn, hdc in each hdc across (8 st)
Row 9 & 10?: Repeat row 8. (these rows may need to be repeated more or left out all together to achieve the correct size for your dog, so be sure to keep track of your measurements)
Row 11: ch 2, turn, 2 hdc in first hdc, 1 hdc in next 7 hdc (9 st)
Row 12: ch 2, turn, hdc in each hdc across (9 stitches)
Row 13: ch 2, turn, 2 hdc in first hdc, 1 hdc in next 8 hdc (10 st)
Row 14: ch 2, turn, hdc in each hdc across (10 stitches)
Row 15: ch 2, turn, 2 hdc in first hdc, 1 hdc in next 9 hdc (11 st)
Row 14: ch 2, turn, hdc in each hdc across (11 st)
Fasten off. (optional: again I rimmed the piece in hdc for a more finished look, but it’s not necessary)
BELLY STRAP:
ch 10.
Row 1: hdc in 2nd ch from hook and across (8 st.)
Row 2: hdc in each st across (8 st)
Row 3-9?: repeat row 2 until approximately 2 inches before desired length has been reached.
Row 10: turn (do not ch), sl st in 1st hdc, hdc in next 6 hdc, sl st in last hdc (6 st)
Row 11: turn (do not ch), hdc in next 6 hdc. (6 st)
Row 12: ch 2, turn, hdc in next 6 hdc (6 st)
Row 13: ch 2, turn, hdc in next 3 hdc, ch 2 (for button hole), 1 hdc in the next 3 hdc, sl st in last hdc. (6 st)
Row 14: ch 2, turn, hdc in next 3 hdc, 2 hdc in ch-space, 1 hdc in next 3 hdc (8 st)
Fasten off (optional: once again I rimmed the piece in hdc for a more finished look, but it’s not absolutely necessary)
ASSEMBLY:
With darning needle sew wide ends of chest section onto end of back section
Sew belly section onto one side of back section, leaving space for dog's front legs in front of strap.
Sew button onto opposite side of back section – aligning it with the belly strap button hole end.
NECKLINE: (optional)
I added 2 rounds of hdc around the circle created from attaching the chest section to the back panel, so it would fit up a little closer around my dog’s neck to better keep out the cold. I found that adding some rounds in the neckline also gives the garment better structural integrity, helping to avoid over-stretching of the chest panel.
Weave in ends, and you're done!
I just took rough notes as I made the project and typed them up here, so please let me know if there are any mistakes. And if you use my pattern to make a sweater for your dog please let me know (we'd love to see pictures!). :-)
RELATED POSTS:
That is SO cool!! I think each of my dogs need one of these coats.
ReplyDeleteThanks! I'm sure Rufus and Abby would both love a warm jacket. :-)
ReplyDeleteThank you, now to cut it down for a chi-wienie (breaks out calculator).
ReplyDeleteHave a look at that Related Posts link I included at the bottom of the post. I made another sweater just like this one for my Mom's tiny Chihuahua-terrier mix without any major conversions. Hope that helps. :-)
ReplyDeleteThis is perfect, we have three dogs from toy to large, this will work out just great. Thanks so much for sharing!
ReplyDeleteSorry, I missed your comment before. I hope your dogs like their new sweaters! :)
ReplyDeleteThanks for the pattern! I measured my Chocolate Lab tonight, and learned that she is wider then she is long- yikes! I knew she loved her food, but compared to your "working "dog," she's fat and spoiled. I appreciate the pattern with the measurement so we can "adjust" it. =). I"m planning to move from Florida to Oregon with my Lab, and I"m looking forward to making her a coat to help ease the transition. Thanks again!
ReplyDeleteYou're welcome, Emily. I hope your Chocolate girl likes her new sweater. My guide dog moved from the warmth of Southern California where he was raised and trained to winter in the Midwest with me, so that was part of my motivation for making him a sweater too.
ReplyDeleteI just made this coat for my Bulldog! I had to modify it like you wouldn't believe, but I managed to make it and it is PERFECT for her! I'm in love with it! Thanks for the great pattern!
ReplyDeleteYou're welcome! A bulldog has quite a different body shape compared to a Lab, so I can imagine you had to change things a bit. I'm sure most people will have to modify the pattern to make it fit their dog's specific measurements. But, nonetheless, I hope my pattern is helpful.
DeleteCan't wait to do this for my chihuahua -pomeranian mix. Tiny little thing at just over 8 lbs. She's gone through several sweaters
ReplyDeleteHope your pup likes her new sweater! My Mom's chihuahua-mix has gone through several sweaters too. He may be receiving another one of these from me soon. ;-)
DeleteI have a female English yellow lab and she looks just like your pup! I can't wait to make one for her, it's very cold this winter in Connecticut! Thanks!!
ReplyDeleteYou're very welcome! I hope your dog likes her new sweater!
DeleteHello and thank you so much for all your patterns and your dedication to the Guide Dog Project. I am making this sweater for my niece's pit bull Millie, 65 pounds of pure love. I do not understand the belly flap, is that worked in rows or rounds? thanks for your help, will post a photo when done. Happy Hooking! Linda
ReplyDeleteIt is worked in rows. Starting at row 10, I left out the turning chains to make the decreases (for the curved end) look more smooth. So, when you get to the end of the row, just turn, without chaining and continue on with the next row's instructions.
DeleteThis is lovely! I have a 13 y/o Dalmatian who, although her body structure is probably slightly smaller than your Lab, weighs just over 60 pounds. I don't do nearly as well with math as I used to - I'm glad I found a pattern for a dog comparable to her size. Everything else on Ravelry was for little dogs ...
ReplyDeleteThanks! There's no math needed really. All you need to do is be sure to measure your dog (and your crochet work) carefully. Every dog is going to have a different body shape/size and thus require a different amount of stitches and rows for a correctly fitting sweater. Nonetheless, you should still be able to achieve the same saddle-blanket style sweater with my general instructions. :-)
DeleteHi! I just wanted to say thank you for posting this pattern. I just adopted a retired service dog named Rudy and wanted to make her something for the Artic cold we are experiencing. I couldn't see how to share a photo here so you can see Rudy on my Facebook fanpage and I shared the link to your blog too!
ReplyDeletehttps://www.facebook.com/IrishHooksandYarn
Thanks again! Sue
You're welcome. I hope Rudy likes her sweater.
Delete