Crochet Project: Lots of Dots Blanket

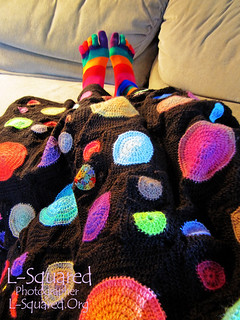
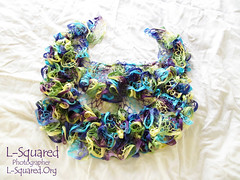
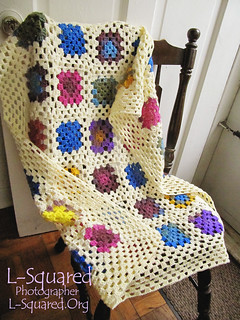
My Lots of Dots project, started at the end of December 2012, is finally finished!!!
crocheted blanket that has lots of colorful dots (small, medium and large) scattered randomly over a brown background.
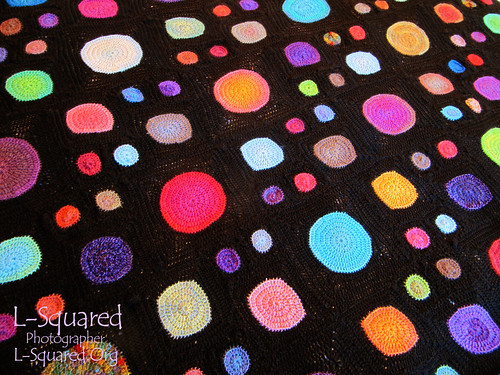
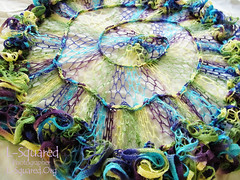
For this blanket, I used a size F crochet hook, this Circles to Squares afghan pattern, and lots of different kinds of sock yarn. I used Knit Picks Stroll in "Fedora" for the squares edging, and various shades of Knit Picks Chroma, Felici, and Imagination, as well as a few other brands of sock-weight yarn for the colorful dots.
More dots.
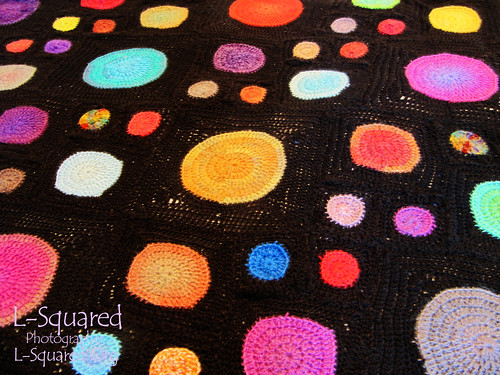
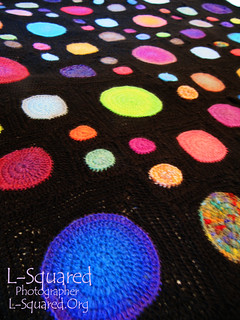
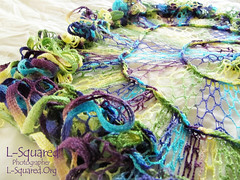
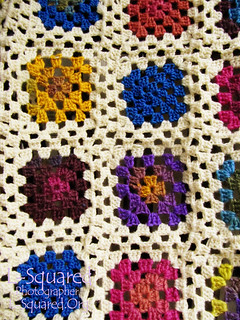
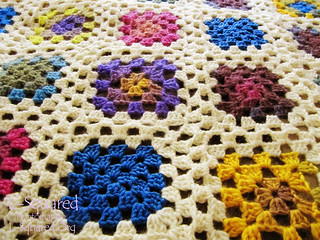
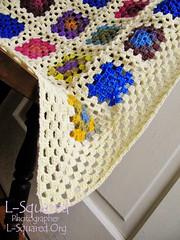
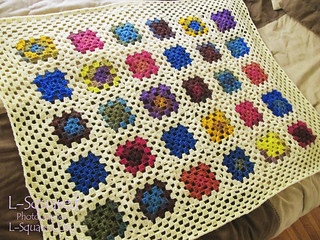
I originally tried a different circles-to-squares pattern for my project idea of making a light-weight blanket out of all my leftover bits of sock yarn, but I didn't like the results of that pattern. So, since I love the Wall Hanging I made a couple of years ago from the afghan pattern linked above, I decided to use the basic idea of it again for this project. However, this time around I used an entirely different design layout; I made A LOT more squares - 126 in total (18 large, 36 medium and 72 Small). I used nearly all of my colorful sock yarn leftovers for the circle parts (color C rounds), and the dark brown yarn for turning the circles into squares (color B rounds) and connecting all the dot squares.
Completed blanket draped over a chair. Close-up of some squares to show the stitch detail.
When I was about a third of the way through crocheting squares, I decided to only work the color C and color B rounds for each square, not the outer-most color A rounds included in the pattern. Why? Well, I was running out of brown yarn (of which I couldn't afford to buy much more). So, I needed my dots have less brown “space” between them. This change resulted in a somewhat smaller blanket - approximately 42 inches by 56 inches after blocking - still plenty big for me.
Close up of a medium-sized purple dot close-up of a large teal dot.
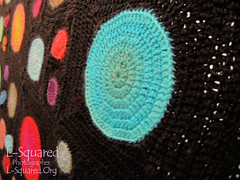
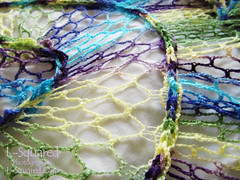
As several people recommended, I worked an extra round of single crochet stitching (working in back loops only) in brown around each circle’s edge before going on to turn the circle into a square (between the last color C round and first color B round). This kept the circles looking nicely round (instead of slightly hexagonal), and it also helped prevent the corner stitching from stretching/leaving such big holes in the medium and large squares.
Close-up of a large metal darning needle threaded with dark brown yarn, in the midst of stitching blanket squares together.
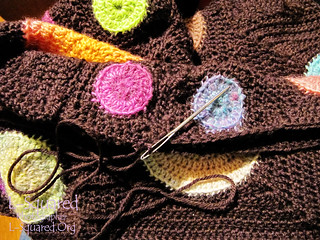
I have spent the last month or so sewing the blanket squares together (using the invisible seam technique), during any spare moments. However, because sewing is not my favorite part and since I was so close to being done with the whole thing, I repeatedly talked myself out of making more Work in Progress posts for it. Here are all the WIP Wednesday photo-heavy posts I did make this year though, which may contain more helpful details on this project, in case anyone is interested: Week 1, Week 2, Week 3, Week 4, Week 5, Week 6, Week 7, Week 8, Week 9, Week 10, Week 11, Week 12, Week 13, Week 14, Week 15.
Working the finishing edge around the blanket - simple rounds of solid double crochet stitching. Completed blanket laying out flat on a white sheet.
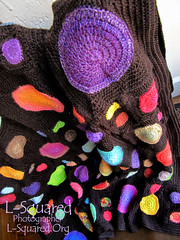
After finishing all the sewing earlier this week, I also worked three rounds of solid double crochet stitch around the entire the blanket. It's a simple/plain edging, but I think it does give the project a more finished look.
Close-up of the finished blanket draped over a wooden chair.
Despite the five month break from crocheting squares in the middle (and another almost three week break during the sewing part), the entire project came together much more quickly than I originally expected it to. And I am very happy with how this colorful, snuggly-warm project has turned out. It has been a lot of fun! :D
Blanket covering up my legs outstretched on a couch. Close up of a large blue/purple dot with the rest of the dotted blanket out of focus in the background.

Crochet Project: Flower Power Scarf

I finished crocheting a neat scarf today!
Scarf with a flower-like stitch design made of yarn that fades from red, to orange to blue to green to purple and then repeats all over again.
For this project I used a skein of Bernat Mosaic in the "Optimistic" colorway, a size H hook and this great Spiderweb Squares scarf pattern (PDF file). This was a very fun, surprisingly quick and easy pattern, but with the colorful yarn I used, I think the design looks more like flowers than spider webs. ;-) I used the pattern supplied for the narrow scarf (but appreciated the inclusion of modifications for a medium or wide scarf), and I just continued to repeat the design until I ran out of yarn. So, I ended up with 16 "squares" for a scarf that measures approximately 4 inches wide by 84.5 inches long.
Close up of the neat flower square open-stitch design in the scarf
This fun scarf - available for a donation to my guide dog puppy sponsorship project - would be a great accessory for cool autumn/spring days.

Crochet Project: Meadow Socks

I've had two skeins of Knit Picks Stroll Multi yarn in the "meadow" colorway for quite awhile, that I had tried at least three other projects with before I found one I really liked... no, not another scarf. Socks!
socks modeled on feet - the socks are made of yarn that is dark chocolate brown with small sections of lime green and magenta.
For my Meadow Socks I used a size D hook and this Step-by-step socks pattern. As an experienced crocheter, I found this pattern writeup more than a little cluttered/bloated and somewhat more difficult to navigate than it should be for relatively simple socks, thanks to all the extra, and in my opinion unnecessary, details that are included. I suppose this pattern might be good for a beginner crocheter and/or anyone who has never made socks before (if you have some usable vision) because there are lots of pictures accompanying every single step of the project from how to make a foundation chain to how to finish off the completed sock. However, if you are so new to crochet that you don't know the basics (like how to make a slip knot, a chain stitch, a single crochet stitch, a double crochet stitch, etc.), I would definitely NOT recommend socks for your very first project ever. I've been crocheting for around 25 years and sometimes sock patterns still give me more trouble than they're worth. Nonetheless, for those who wish to give socks a try, this pattern - worked in my preferred method, from the toes up, so you can try them on as you go - can yield very nice results.
It's always fun to see how multi-colored yarn is going to work up, and these turned out with a very unique color pattern.
Close up of the wide zig-zag design the yarn makes on the foot section of the socks Close-up of the skinny diagonal lines of the cuffs which alternate from pink and green to brown.
I worked the toe sections of my socks to 52 stitches as written. Then, I worked foot sections approximately 23 rounds. I didn’t need any increases or decreases in this section, as described in the pattern, since the resulting fabric closely fit the contours of my foot well. I noticed there was A Better Short Row Heel pattern posted more recently on the same blog as the original sock pattern, so I ended up using that for the heel sections of my socks instead of the one included in the sock pattern, because this “better” pattern does make a nice, less holey heel. The only modification I made to this pattern is that I did work a couple of extra increases near the end of the heel turn to give a little more room for getting the fitted socks on/off over my heels/ankles (since this is always the problem area for me with crocheted socks as a result of them generally not being very stretchy like knitted socks are). Then, I continued on to the sock cuffs, working the "grit stitch" pattern until I ran out of yarn.
Completed socks laid out on a flat, white surface. Another shot of the socks on my feet, giving a better view of the heel section of the socks
This resulted in nice, warm, mid-calf length socks. My feet were protesting having to model them since it's the middle of summer here, but I'm sure the socks will be great in the winter.

Crochet Project: Ocean Waves

Scarf with a wavy stitch pattern in various hues of blues and teal greens. Close-up of a teal section of the wavy stitch pattern.
I crocheted this scarf with a skein of Bernat Mosaics yarn in the "Spectrum" colorway, a size H hook and an easy One Skein Chevron Scarf pattern (Ravelry Download) that I have used before and really enjoy. I thought the ocean blue and teal hues of the yarn might nicely suit the wavy stitch pattern of this scarf. I worked the narrow scarf pattern, which resulted in a scarf measuring approximately 4.5 inches wide by 65 inches long. As usual, I would be happy to trade this pretty scarf for a donation to my Guide Dog Puppy Sponsorship project.
Close-up of one of the wavy ends of the scarf. One more view of the wavy scarf laid out flat.

Crochet Project: Mossy Ninja

Yes, it's another scarf... I crocheted this project with a skein of Bernat Mosaics yarn in "Ninja", a size H hook and Margaret's Moss Scarf pattern. It's a fun, easy pattern - just alternating sc and dc - which makes a neat texture. I did a base chain of 15, which resulted in a scarf that measures approximately 3.5 inches wide by 68 inches long. And as usual, this scarf is available for purchase in exchange for a donation to my guide dog puppy sponsorship project.
Roughly textured scarf crocheted from yarn that fades from sections of black gray, lilac, plum, moss green, dark teal, and brown. Close-up of the neat textured stitching of a purple and dark teal/green section of the scarf
Close-up of one of the straight ends of the scarf. Another close-up of the mossy textured stitching of a moss green and gray section of the scarf.

Crochet Project: Hydrangea Shawlette

Recently my sister surprised me with some really cool yarns including some ribbon/net yarn. I hunted around for patterns that would be fun to try with this unique yarn type, and finally settled on a spiraled shawl project:
Circular, spiraled mesh shawl in hues of yellow, green, teal, blue and purple.
For this shawlette I used a size J crochet hook, a skein of Premier Yarns Starbella yarn in "Wild Hydrangeas" colorway and this Kelp Forest Shawlette pattern (Ravelry download). (Obviously, I used the crochet hook method for this project rather than the single knitting needle method.)
I struggled with this project at first; even after watching the pattern designer’s tutorial video several times, I kept getting a tube. The key to this project for me was working the wide edge stitches very close together (every hole) at the beginning, while the thin edge loops were worked much further apart (every 3rd hole). That extra bit at the thin edge allows it to flare out and into a flat spiral instead of just continuing to fold in half making a net tube. Once I got the spiral going, then I worked the thick edge about every 3rd hole and the thin edge every other hole.
Closer-up view of the shawl Round shawl from another angle.
Close-up of the mesh middle of the shawl Close-up of the ruffled edge of the shawl.
I only had one skein in this colorway, so the shawl is small (approximately 28 inches - it's stretchy), but the finished project does look really neat. I'm not sure I'd ever want to make another one of these, but it has definitely been an interesting adventure in using this mesh/tape yarn for the first time.
Circular project folded in half to make the ruffled mesh shawl shawlette being modeled - front view over the shoulders
side view of the shawl being modeled - covers shoulders and all of upper back. Back view of shawl being modeled - hangs down to mid-back.
I probably wouldn’t ever wear this shawl though - I just made it because the pattern technique intrigued me - so the shawlette is included on my Will Trade for Donations page, in the hopes that someone can get some good use out of it.

Crochet Project: Kaleidoscope Blanket

Most of my crochet time over the last week has been spent making a fun granny square blanket.
Granny square blanket draped over a wooden chair Close-up of colorful granny squares.
To make this colorful little blanket, I used size F, I, and K hooks with Elegant Yarns Kaleidoscope yarn in "Confetti" and "Sun Rise" colorways and some unlabeled off white colored yarn. I worked 30 basic (3 dc, 2ch) 3-round granny squares out of the colored yarns. Then, I crocheted the squares together, using THIS neat granny square technique. I am pretty obsessive about things lining up, which this joining method does NOT do (as warned in the tutorial), but nonetheless, I really like this method of joining - it almost makes the blanket look like one big granny square.
close up of more colorful squares in pink, maroon, yellow, gold, green, blue and purple. Close-up of the granny-square style joining and edging of the blanket made in an off-white colored yarn.
A few of one of the blanket corners, made with the granny square stitch pattern in off-white yarn. completed blanket laid out flat.
The result is a neat baby/toddler/pet sized blanket (32 inches by 39 inches) which, as usual, is available for trade.

Crochet Project: Party Hat

Earlier this week the silly idea that my guide dog, Jack, needed a party hat for his upcoming 5th birthday just randomly popped into my head. I was originally thinking I would buy him one of those cheap cardboard ones or maybe I would just make him one out of paper or something. But then I thought, "Why don't I crochet him a party hat?", and this project was born.
cone-shaped party hat crocheted with yellow, purple and blue yarn.
To make Jack's birthday hat I used a size G hook, some Elegant Yarns Kaleidoscope yarn in the "Sun Rise" colorway, and this easy to follow Party Hats pattern. Of course, I modified things just slightly since I made it for a dog. I added a few extra rounds (31 rounds total) at the bottom to make the hat better proportioned for my chocolate boy's large Labbie head, before going on to add the ruffled bottom and pompom topper. I also worked a row of fdc in a loop for the chin strap (because I didn’t have any elastic handy at the time). And, instead of using card stock to give the hat better structure, I just stuffed the cone-shaped part of the hat with some light weight filler. Then, I crocheted a round bottom and sewed it inside to hold in the stuffing.
hat laying on its side to show the round bottom panel. Up close view of the pointy top of the hat with a big fluffy pom-pom of yarn on top.
<Close-up of the ruffle around the bottom edge of the  hat and the foundation-double crochet chin strap. Completed party hat.
The colorful party hat fits Jack perfectly; he tolerates it as well as he does his Santa hat; and he looks adorable in it, of course. You'll have to wait until his actual birthday - when I'll try to take some nice birthday boy portraits - to see him model it though. :-)

Crochet Project: Furry Scarf

Recently my Sister gave me two balls of unlabeled eyelash yarn in Halloween-ish colors, so I decided to combine them to make a furry striped scarf/boa for her.
Furry scarf in progress, just a few rows done. Close-up of the orange and gray shaggy fur of the scarf.
Close up of the orange and gray stripes Completed scarf.
I have a love-hate relationship with this type of yarn (it can be a pain to work with, but it can also yield neat finished projects), so I wanted to keep things fairly simple. I used a size K hook and worked an alternating stitch pattern of chains and half double crochets, worked in the chain spaces - with a base chain of 13. I alternated yarn colors every two rows, but there was more of the burnt orange color than the silver/black color, so the ends of the furry scarf are solid orange. The completed scarf measures 3.5 inches wide by 72 inches long.
Completed scarf laid out to show it in its entirety.