Crochet Project: Groovy Socks

My most recently completed crochet project, which I just finished off a few days ago, is a pair of fun, warm socks for myself. I used this Socks That Fit pattern, a size D hook and 3 skeins of Knit Picks Felici Sport Self Striping yarn in the "Groovy" (green, purple, brown, orange, blue and pink) colorway.
8 photos showing the progress of these colorful striped mid-calf high socks from the first couple of rounds of the toe to working the heels half-way done, to the completed socks on my feet.
It was easy to achieve a really good fit for these socks, once I stopped guestimating the right size and finally put forth the effort to actually measure my feet accurately. Imagine that! Haha! My gauge was 7 hdc/inch; my foot measured 8 inches in circumference and 9.5 inches in length. So, using the formula in the pattern (7-1=6x8=48) I started with a base ch of 11 and increased to 48 st in circumference for the toe/foot part of my socks.
I did the “6 steps” decrease (described in the pattern) down to 12 st for the heel and increased back up to 52 for the beginning of the cuff. Then, for the cuff, I just continued to work in hdc until I ran out of yarn - using about 1.5 skeins per sock, to make them taller for winter socks.
Like most crocheted socks, this pair is not stretchy, so I must take great care when putting them on and taking them off, but they are still very nice and comfortable to wear.

Crochet Project: Kitchen Towel Set

As I started finishing up all my holiday projects I began working on a few projects for myself. The first of them was a kitchen towel set, using this Hanging Dish Towel pattern, a size H hook and a little less than one skein of leftover Lion Brand Lion Cotton yarn in "Orchid".
8 photos of bright magenta (pinkish purple) colored kitchen towels that have button-top closures on the top to hang over cabinet handles. Some up-close shots to show the stitch pattern and scalloped edging, and the textured silver buttons on the tops, plus some distance photos to show both of the towels hanging against my white kitchen cabinet doors.
For one towel I worked the entire pattern as written, but added a few extra rows in length. For the second towel I worked the pattern for the first 25 rows, but then I switched to solid hdc for 20 rows. Then, I went back to the pattern and worked row 20 again to finish off the towel with the scallop stitched bottom edge to match the first towel.

Crochet Project: Kitchen Towel Hangers (with Pattern)

Kitchen towel hangers are a recent crochet project that I hadn't originally intended to be a holiday gift, but one of them ended up as such. So I had to postpone writing about them for a bit too.
Recently my Mom mentioned that the ring-shaped towel hanger she uses in her kitchen (which I think maybe my Sister made for her a few years ago?) had gotten stained. I told her I could re-do it for her with some new yarn, and she chose some of my leftover Red Heart Super Saver in Heartfelt.
Not long after that, I was reorganizing what is left of my yarn stash after all the other holiday projects were complete, and I came across a bit of leftover vintage Carousel Remember yarn in the "Classic" colorway, which is a variegated red, off white, and gray yarn. The colors reminded me of the colors in my Sister and Brother in Law's newly remodeled kitchen. I knew my Mom was getting them some new towels and things to match their new kitchen as holiday gifts. So, I mentioned the yarn to her, and told her if she had any extra rings I would be happy to make a new towel hanger for her to give them with their other new kitchen items.
Well, of course, my pack-rat Mother had plenty of metal and plastic rings for me to use for this project, so I ended up remaking her original towel hanger, making a new one for my Sis and BIL, and making myself a towel holder for my kitchen too.
Ring-shaped towel Hangers in progress and complete, except for the buttons.
I looked for patterns for towel holders, and found a few, but none that I really liked, so I ended up just looking at/feeling my Mom's old one and copying how it was done. I used a size G hook, the worsted weight yarns mentioned above, and did the following:

Round 1: sc or dc (depending on the thickness of the ring) around a metal, plastic or yarn ring, working until the ring is entirely covered. For my metal and plastic rings - which were each roughly 3 inches in diameter on the inside - I needed about 60 st to cover them. Then, Sl st last st to first. Ch 1.

Round 2: sc in each stitch around ring. Sl st last st to first. ch 1.

row 1: 10 sc. ch 3 turn.
row 2: dc across. ch 1, turn.
row 3: sc across. ch 3, turn.
row 4-11: repeat row 2 and 3 four more times.
row 12: dc across, ch 1, turn. (10 st)
row 13: decrease 1 (work first 2 st tog.) sc 6 across decrease 1 (work last 2 st. tog.). ch 3, turn. (8 st.)
row 14: dc across. ch 1, turn. (8 st)
row 15: decrease 1 (work first 2 st tog.) sc 4 across, decrease 1 (work last 2 st tog.). ch 3, turn. (6 st.)
row 16: dc 3, ch1 (for button hole gap), dc 3. ch 1, turn. (6 st.), ch 1, turn. (6 st.)
row 17: sc across row, down side, and all the way around entire top and ring. sl st last to first st. fo.

Sew on button.
The plastic ring I used in the hanger I made for myself was much thicker than the metal rings I used for the other two hangers, but in the end it didn't make any difference in what I did to cover it, and it still looks very similar to the metal-ring hangers.
My towel holder with a white towel through the ring, hanging on the metal handle on my oven door.

Crochet Project: Beds for Kitties

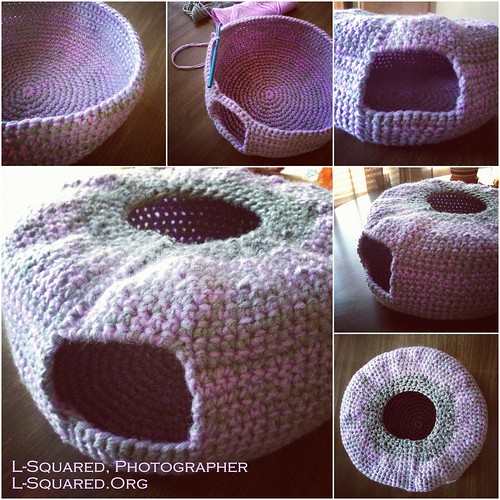
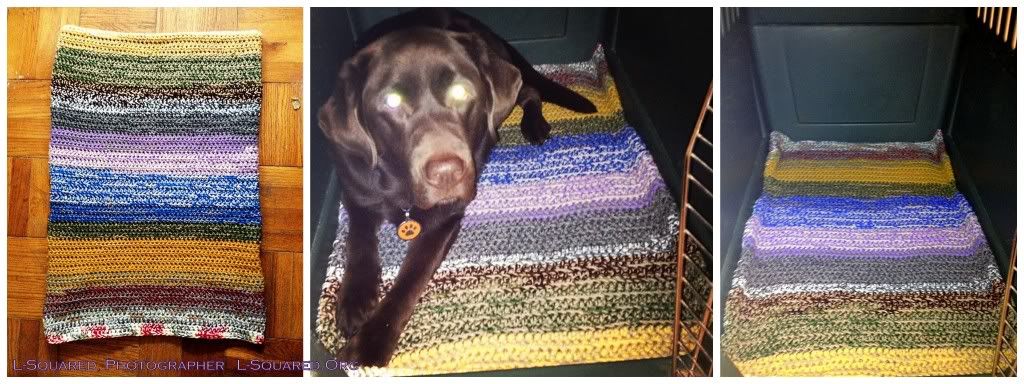
I originally thought I would just crochet little blankets as holiday gifts for the four feline members of my family, but then I saw this pattern for a cute cat Nest (scroll down toward the bottom of the page for the English translation), and just had to try it out.
Although I used the same pattern for all four cat beds, they are all unique thanks to the different brands of worsted weight yarn I used to make them. Unfortunately, I didn't have any yarn that was as thick as the yarn the pattern author used (nor did I have any wool yarn I could have shrank/felted the projects down to a smaller/sturdier size with), so I just worked with multiple strands of yarn for each bed and hoped for the best.
The pattern was easy to work up. However, I did make one minor change in how I worked the opening of the bed. Instead of working it as written (i.e. cutting the yarn every round), I just worked the round until there were 10 stitches left. At that point I did a ch 1 and turned, then worked the round all the way around to where the previous round began. When back at the beginning I did another ch1 and turned again to work another round back to where the previous round ended. I repeated this until the opening was 7 rounds high, as called for in the pattern. This technique achieved the same effect without having to fasten off the yarn every round.
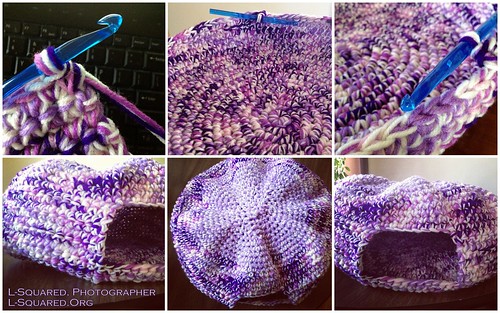
For the bed for my Mom's cat, Sierra, I used a size L hook, with a triple-strand of purples and white variegated yarn, paired with a strand of lavender and a strand of white yarn. And for this bed I did a 12 stitch (instead of 10 as the pattern calls for) opening, because Sierra is big and fluffy. Unfortunately even with a triple strand of yarn the bed was still too “soft” to stand up/hold its shape well. So, I doubt Sierra will actually want to go inside. She will probably end up flattening the top down and laying on top of the disk instead.
Big purple and white round, dome-shaped cat bed in progress and completed.
For the bed for my Sister and Brother-in-Law's cat, Tesla, I used Size J hook, and worked with a double strand of yarn - a variegated (white, pink, green and blue) paired with a pale pink strand - for the top and bottom of the bed. And for the sides of the bed I tried some solid blue slightly thicker, rug yarn (hoping that would help it stand up better). It sort of holds it's shape, but it’s not perfect - the top still sort of collapses. So, this may be another bed that gets flattened into a disk and laid on top of.
Dome-shaped cat bed with medium blue sides and pink and blue bottom and top
For the bed for my Dad's cat, Rio, I again used a J hook, blue rug yarn (for the sides and top) and more of the variegated (white, pink, green and blue) yarn paired with a white for the double stranded bed bottom. This one doesn't stand up at all, but this big, fat cat wouldn't fit inside of it anyway. The bed flattens out into a nice disk-shaped bed for her though.
Flat disk-shaped round cat bed with a blue top/center and a pink and blue edge/bottom.
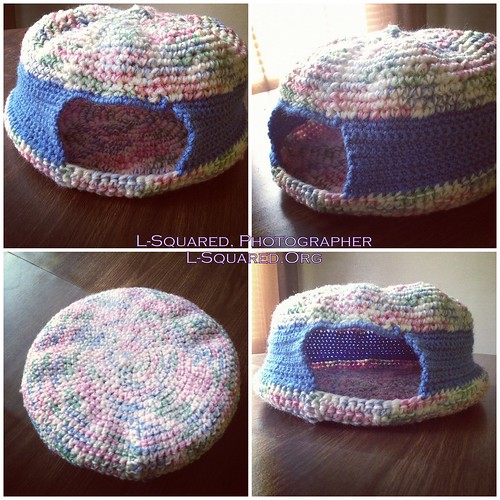
And, last but not least, is the parents' rescued baby cat's bed. I again used a size J hook and I worked with a double strand of lavender and gray yarn. I'm not sure what, if anything, I did differently this time around, but this bed stands up the best of the four beds I made - it's nearly perfect! Maybe it's because the top isn't so heavy, since I ended at round 36, to leave another hole in the top. This playful baby cat is the only one of the bunch that is very likely to want to go hide inside her little bed, so I decided to give her two entrances/exits to go in and peek out of (which I've been told she loves to do).
Pale-purple and grey igloo-shaped cat bed with an arched opening in the side and a round opening in the top.
Sorry, I don't have pictures of any of the cats using their new beds. They all get quite shy when my guide dog and I go over to their houses for a visit.

Crochet Project: Striped Small Dog Sweater

The last canine family member's holiday gift crochet project was a striped small dog sweater for my Mom's little dog, Riley.
Riley is often dressed in a sweater or coat to keep him warm in the winter, so I had originally planned to just make him a new sweater from my dog sweater pattern, like the one I made him last year. But one day I decided to check out some other dog sweater patterns anyway, to see if there was another one I might like to try for him.
I really liked the look of the long stitch striped design in this Crochet Dog Sweater pattern, so I decided to make it for Riley instead of my own pattern. I used a size J hook and more Red Heart Super Saver yarn in the blue and Heartfelt colorways for this sweater.
6 photos of a small blue striped dog sweater being constructed and completed, laying out flat across the keyboard of my laptop.
Unfortunately, Riley (a chihuahua-terrier mix) is a little guy but he's extra long-bodied, so I had to modify this pattern quite a bit to get a sweater that would fit him correctly. I needed to make a size in between the small and medium, with a lot of extra length. Thankfully, the pattern was very easy to change where needed to in order to achieve the appropriate size. I didn't record all the little changes I made, but basically I followed the instructions for a small sized sweater and just added in a few more stitches and rows everywhere. I also continued to work the pattern for the back part of the sweater many more rows to make it long enough to cover Riley's long body. The pattern was quick to make; I finished the sweater in two evenings, and I could have done it all in one night, but I wanted to double-check the fit before finishing it off.
Sorry, I don't have any photos of Riley in his sweater yet, but I have been told he has been wearing it when he goes outside and that it fits him perfectly.
*** Cross-posted to Crocheting Blind

Crochet Project: Big Dog Blankets

Since I had plenty of time (and yarn), the furry members of my family also ended up receiving crocheted holiday gifts this year.
The three big dogs all got blankets/mats. I have made many of these before for the dogs of family and friends, but I have never bothered to write out a specific pattern, because it's just a matter of choosing what length and width you want/need for your dog and working in a solid stitch until the correct size is achieved. I use a big size 9.0mm M/N hook, hdc stitches, and work with a double strand of worsted-weight yarn to make the mat a bit thicker for more cushy (usually a neutral color like black, tan or gray paired with a bolder color or variegated yarn).
The mat for my Dad's dog, Sable, was made of off-white paired with blue, purple, red, orange, and gold yarns of various brands. We have heard that Sable likes to try to curl up and fit her big self on the small mat I made for my Mom's little dog a few years ago, so hopefully now she will be more comfortable napping on this mat which is just her size. My boy Jack tried it out before we gave it to Sable. ;-)
Chocolate Lab Guide Dog Jack models Sable's colorful mat by stretching himself out across it.
I wasn't sure if my Sis and BIL's dog, Talon, would use a blanket, but I wasn't sure what else to crochet for him (he probably wouldn't wear a sweater or a bow tie). So, I dug out all the variegated yarns in browns, rusts, tans and greens in my stash and paired them with off white and a dark sage green for his blanket. Jack had to test out this blanket too.
Guide Dog Jack doing some quality control testing on Talon's green and brown blanket by sprawling out on it.
Jack actually already has a colorful resting mat, that I made for him before I even knew my next guide dog would be his adorable chocolatey self. However, I decided he could use another one that was made specifically to fit inside his kennel. He rarely goes into the crate, but when he does need to spend a few minutes in there for whatever reason, he can now rest more comfortably with a better-fitting mat in the bottom. And since this one is for the kennel I decided to crochet the mat a little over twice as wide, then fold it in half and sew all the edges together, so it would be double-thick. Like the others, Jack's mat is made of many different colors - neutral colors (gray, tan, off-white, brown, black, etc.) paired with brighter colors (gold, green, blue, purple, red, etc.) of various yarn brands.
Jack trying out his new colorful mat in his green plastic kennel.

Crochet Project: Owl Square Afghan

The last blanket I crocheted for a human family member's holiday gift was an owl granny square blanket for my Mom.
24 photos showing the progress from a box full of yarn skeins to a completed afghan - showing the construction of one owl square in detail and then the arranging of the various squares into a color pattern, adding the face and feet details, stitching the squares together and then lots of finished photos showing up close views of  as many of the adorable brown owls on orange, green, aqua and magenta squares as possible.
My Mom loves owls, so when I stumbled upon this cute Owl Granny Square pattern, I knew I had to incorporate it into a blanket for her. I used a size I hook and Vanna's Choice yarn in Aqua, Kelly Green, Terracotta, and Wild Berry, for the squares, with Barley for the owl bodies and some leftover scraps of white, black and pale gold worsted weight yarn for the details on each owl.
I noticed a few slight errors in this pattern: incorrect color reference - pink instead of blue - in comparison to the accompanying photo/diagram; saying skip every other stitch when it should be every other PAIR of stitches (as is indicated in the accompanying pic/diagram), in order to get the correct number of chain 3 spaces (8) when attaching the yarn for the rest of the square to the back of the owl; and most importantly (at least for us left-handed crocheters), “start to the right of the ear” should be LEFT of the ear when working with the wrong side facing up where you’re attaching the chains, in order to get the owl to not be crooked on the square. With a little trial and error I worked through these small issues though.
I did struggle a fair amount while trying to attach the yarn for the rest of the square to the back of the owl. The pattern made this look easy, but in practice, for me, it was a lot more challenging than expected.
I also ended up chaining 2 (instead of just 1) at the corners of each round of the squares to give them a little better shape.
This blanket is made up of 80 squares - 31 owl squares mixed with 49 non-owl squares (some 1 solid color, some all colors). For the non-owl squares I essentially worked the same pattern as for the owl squares, just leaving out the row that makes the owl’s “ears”.
Warning: there are 20 or so yarn ends to deal with for each owl square! Because of all the ends and different colors used for the square itself and the detailing, the backs of my owls squares are messier than I would have liked them to be, but there wasn’t much I could do about that.
I did the owl eyes differently than the pattern, to help cut down on the number of things that need to be sewn onto each square. Instead of using white disks and black buttons, for my owls’ eyes I did the following: with black - magic ring, 4 sc in ring, slst to beg. Attach white yarn, 2 sc in each st, slst to beg. fo. Similar look; half as much sewing required. I probably should have used a smaller hook for the eyes though, because they turned out kind of big in comparison to my owl bodies.
I have to give huge thanks to my Sister for sewing on a great majority of the many owl eyes, beaks and feet. Unfortunately, my very sore, blurry eyes were not up to this task when it finally came time for this detail work to be added.
For construction I decided to just crochet the squares together with sc in aqua. Then I added a finishing edge with one round of hdc in aqua; 1 round of sc with the small bits of berry, terra and kelly that I had left; and then one last round of hdc in aqua. The finished afghan measures approximately 50 inches by 62 inches.
This project took just over two months to complete and was a huge amount of work, but over all I’m happy with how the blanket turned out. And, most importantly, my Mom loves it! :-)

Crochet Project: Camo Blanket

Next up in my holiday gift crochet project queue was a camouflage blanket for my outdoorsy Dad:
6 photos of the forest camouflage blanket in progress and finished. The camo-colored stitching is divided into long narrow sections which are bordered by rows of black stitching.
I used this Goddess Afghan pattern (free Ravelry download), a size L hook, Red Heart Super Saver yarn in Camouflage and some unlabeled black acrylic worsted-weight yarn. This pattern is another easy one to work up, and is another good tactile pattern for blind crocheters. The stitch pattern is simple to remember, but the every-other-stitch change helped me to not get quite so bored with it.
I must admit I felt a little bad at first, making a blanket called “Goddess” in camouflage yarn as a holiday gift for a guy. Haha! But I really like the look of the pattern, so although I’m personally not a fan of the muddy brown, tan, green and black camo colorway, I must admit it does look kind of neat with the texture this alternating stitch pattern creates.

I originally worked the pattern as written with a size K hook, but I worked about 20 rows of the pattern and realized it was yielding a disproportionately long blanket which - with the amount of yarn yardage stated on the pattern page - I wasn’t going to achieve even half of what would be an appropriate corresponding width for the blanket. I had also planned to work the same-stitch rows (13-15) in a dark sage green yarn, but after trying that I noticed the greens in the two yarns weren’t alike enough to look good together.

So I frogged the entire thing and started over with 128 st rows (instead of 201) and a slightly larger hook (L in stead of the K) - with these changes I got about 30 rows per skein instead of only about 18. I still ended up having to purchase more camo colored yarn though, because I needed to work more rows than the pattern included - 159 instead of 119 - to help achieve a more evenly-proportioned blanket.

Because of the texture the alternating stitches created, I found it a bit more challenging to be able to count the number of rows worked (either by sight or touch), so I had to be diligent about inserting a stitch marker in the end of each row to help me keep track. I worked alternating-stitch sections of 12, 24, 36, 36, 24, and 12 rows each to yield a roughly 5 by 6 foot blanket. I also switched to black yarn for the same-stitch rows in between the camo sections, which I think looks much better than the green I originally used.

For the blanket border, I worked the first round in black, and the second round in camo.

This project took me about a month to make, but I took several small breaks from it to start or work on other projects that were a bit more fun for me to crochet - I think I have a tougher time making projects when I don't like the yarn I'm using. However, I eventually finished it, and I am very happy with how this blanket turned out.

Crochet Project: Checkered Flag Blanket

The second holiday gift crochet project I made was a Checkered Flag afghan for my NASCAR fan Brother-in-Law:
7 photos of a checkered flag afghan made up of black and white squares in progress and complete - one black square in progress, a white square in progress, lining up the checkered pattern with squares, sewing squares together, a close-up of the black and white edging and two photos - one up closer and one further away of the finished blanket
I used this Race Flag Blanket pattern, a size N hook and various skeins of black and white yarn including Caron One Pound.
When I first came up with the idea of making a checkered flag blanket, I considered just making a bunch of plain solid hdc (or whatever preferred stitch) squares and sewing them all together. Super simple! But, I ended up choosing the pattern linked above instead, because it was a bit more unique - the blanket is worked with a double-strand of yarn and each square is worked from the center, in rounds, outward. The square pattern is simple to remember, consisting of only 5 rounds and it's easy to work up. Plus, each completed square measures roughly 12 inches, so the blanket really came together quickly for me (in about two weeks). It probably took me longer to sew everything together than it did to make the 35 squares (18 white, 17 black), just because I do not enjoy sewing.
I sewed the squares together with white yarn (instead of black like the pattern calls for, because I had extra white yarn in my stash), using an invisible seaming technique. And for the finishing edge around the outside, I worked the round of single crochets in a double strand - one white strand and one black strand (instead of both black, like the pattern used).
The finished blanket measures approximately 60 inches by 84 inches.

Crochet Project: Heartfelt Woven Blanket

Now that my family's holiday celebrations are over, I can finally blog about all the crochet project holiday gifts I made this year!

Since I unfortunately ended up with nothing but spare time on my hands early on this year, at the beginning of June (mainly out of utter boredom and frustration) I decided to attempt to crochet all of my 2012 holiday gifts... at least for the human members of my family. And since I had so much time to work on projects, I also hoped to maybe be able to make some more complex/challenging patterns for gifts.

I had a craving to crochet blankets again - even though everyone I know has lots of blankets. I love crocheting them, but have avoided making many in the last couple of years because for a long time they were the only thing I wanted to and/or did crochet. So, I set out looking for neat afghan patterns to suit each of my family members' tastes.

Unfortunately, having lots of spare time also means having very little spare money for yarn. So, in the end, I had to compromise quite a bit on my projects. I had to forgo making the most awesome blanket patterns I discovered and also forgo using some of the slightly more-expensive yarn types/brands I have grown to love working with best. Instead, I almost exclusively used some of the many boring skeins of acrylic yarn I have amassed in my stash from previous projects and my Mom's great yard sale finds.

So, anyway, on to the projects!

The first blanket I crocheted was a Heartfelt Woven blanket for my Sister:

6 photos showing the making and completed plaid-patterned blanket in various shades of blue, green, aqua, red and purples - close up of the blue mesh part of the blanket, close up of the variegated chain strand that will be woven through the holes in the mesh, close up of a chain strand being woven into the mesh, another photo showing progress on the time-consuming weaving process, and two photos of the completed blanket, one further away - showing the size and one closer up showing the woven plaid design of the blanket.

I based this blanket on this Noro Plaid scarf pattern (the same one I used for my colorful scarf I made a month or so after finishing this blanket). I worked the basic woven idea of the scarf pattern, but I used a bigger hook (size J), thicker yarn (Red Heart Super Saver in Blue and Heartfelt - which I had leftover from a badly over-estimated purchase for a project I made earlier in the year), and more stitches/repeats in order to make a blanket instead.

The mesh for the blanket (in blue) is 86 spaces wide by 102 spaces long - a good size for covering up a person on a couch or wrapping around the shoulders. I was going to just make one gigantic long chain (in Heartfelt - blues, aqua green red and purples) for weaving, but ended up dividing them up, enough for about 6 rows at a time, to make the weaving a little easier to manage. I also worked a finishing row of solid single crochets around the outside edge - using it to help anchor the 2 ends of woven chains in each row into place.

This project took a lot longer than expected to complete (nearly 3 months!), partly because I waited until I was finished with the entire mesh of the blanket before starting to weave in the chains, so I spent forever weaving them in. Maybe, if I had started weaving as I made rows of mesh, it might not have taken so very long to do.

I love how the blanket turned out though. It was easy to crochet (and easy to feel - a great pattern for blind crocheters) but it looks complex. The finished blanket measures approximately 44 inches by 60 inches.