For quite a while now, I’ve been interested in trying to hand-dye my yarn for a crochet project. After doing A LOT of research into it, I decided that for my first attempt I would dye yarn with Kool-Aid. Since powdered drink mixes are readily available and reasonably non-toxic, it’s a good entrance into the world of dyeing fiber at home, because it’s inexpensive and no specialized equipment is needed. I quite enjoyed doing this little project yesterday afternoon, so I decided to write out a how-to, in case anyone else is interested in trying to hand-dye their own yarn sometime too.
Best Yarn Types:
Kool-Aid dyeing works only on animal fibers: wool, mohair, alpaca, etc. - even human hair! It doesn't work well on cotton or synthetics, though, so for best results use pure wool yarn. Blended yarns containing a high percentage of wool reportedly work, but the non-animal part of the yarn won't take the dye and you won't get very saturated colors overall.
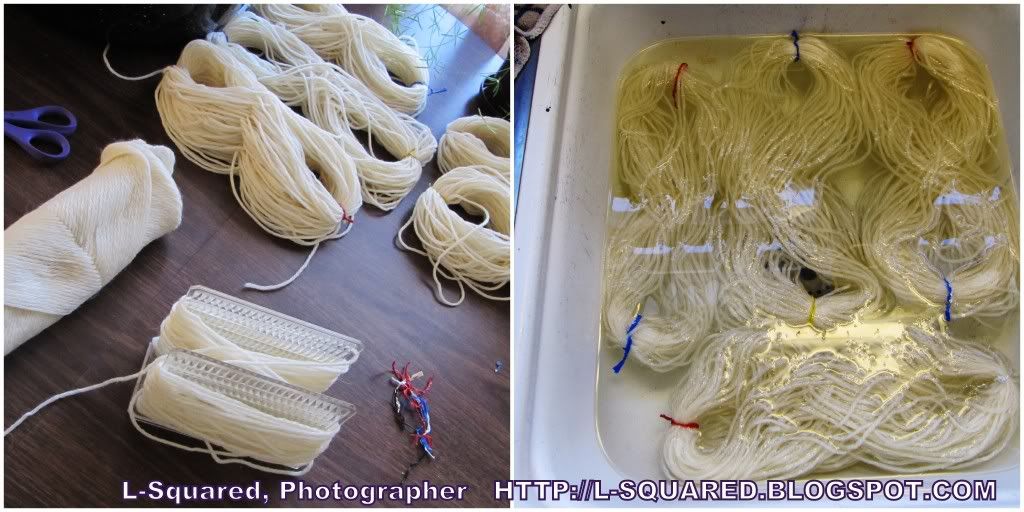
You don’t need to use only uncolored yarns. You can start with a natural, tan, gray or even over-dye a pastel, like yellow. I used an 8 ounce skein of LionBrand Fisherman’s Wool yarn in “Natural” for my project.
Supplies You'll Need:

Obviously, since we’re using it for dye, Kool-Aid stains! Avoid getting it on clothes by wearing an apron and wear rubber or latex gloves if you don't want your hands to evidence your work for a couple of days. A little bleach or baking soda should take care of your work surface, but spreading out a garbage bag on the counter-top before you begin makes for much easier cleanup.
For One Color:
There are two basic methods of setting the dye: stovetop or microwave. I chose to use the stovetop, because from all of my research, this method reportedly yielded better results without running the risk of over-cooking the yarn.
For One Color of Yarn:
Finishing:
Aftercare:
The finished product will be washable (and the fruity smell will fade), just follow the directions for the yarn you've used. If you've washed the yarn thoroughly after dyeing it, you don't have to worry about the colors bleeding in the wash. Just give them the care you would any hand-made item. As is the case with pretty much anything, some fading may occur over time, particularly if it is exposed to a lot of sunlight. However, with care, the bright colors should last for years.
The whole process actually ended up being a lot easier than I thought it would be for me. And, most importantly, I love, love, LOVE how my yarn turned out! I can't wait to start using it for my next crochet project (which I already have picked out). I had so much fun with this, that I might even do it again sometime with more colors and/or other types of dyes. :-)
Best Yarn Types:
Kool-Aid dyeing works only on animal fibers: wool, mohair, alpaca, etc. - even human hair! It doesn't work well on cotton or synthetics, though, so for best results use pure wool yarn. Blended yarns containing a high percentage of wool reportedly work, but the non-animal part of the yarn won't take the dye and you won't get very saturated colors overall.
You don’t need to use only uncolored yarns. You can start with a natural, tan, gray or even over-dye a pastel, like yellow. I used an 8 ounce skein of LionBrand Fisherman’s Wool yarn in “Natural” for my project.
Supplies You'll Need:
- Disposable Rubber or Latex gloves
- Plastic Apron
- Animal-based yarn
- Twist ties or string
- At least 1 package of unsweetened drink mix per ounce of yarn (unless you’re a fan of pale pastel colors don’t skimp on the Kool-Aid!). For my 8 ounces of yarn I used 10 packages of Kool-Aid to get nice, saturated colors.
- Large pot (with lid) or microwave-safe dish
- Metal pair of tongs (optional)
- Steamer basket or some way to keep your yarn out of the water while it steams – I went over and invaded my Mom’s kitchen so I could use her canning equipment, so I used a metal strainer sitting on a canning rack in the bottom of my big pot of water.
- Garbage bags or other large sheet of plastic
- Glass bowls (or disposable plastic cups)
- Metal spoons (or disposable plastic ones)
- teapot (optional)
- You’ll probably need to re-bundle your big skein of yarn into smaller, looser skeins, so the dye can permeate evenly.
- Wind it however you choose (I criss-crossed mine in the middle, but just winding it in one big loop would work fine too)
- Use the twist-ties (or string) to keep the bundles together, but make sure you twist them loosely enough that the dye can get underneath easily.
- Wash the yarn bundles lightly in mild soap. Use the soap sparingly unless you want to be rinsing suds forever (and note that the more your wool is handled the more fuzzy it will become).
- Let the yarn soak in clean water the sink as you continue your other preparations. (You don't need to add vinegar while soaking as you would with other dyeing techniques because Kool-Aid is very acidic.)
Obviously, since we’re using it for dye, Kool-Aid stains! Avoid getting it on clothes by wearing an apron and wear rubber or latex gloves if you don't want your hands to evidence your work for a couple of days. A little bleach or baking soda should take care of your work surface, but spreading out a garbage bag on the counter-top before you begin makes for much easier cleanup.
For One Color:
- If you want all of your yarn dyed a single color, empty your packages of drink mix directly into your pot or microwave-safe dish (don't add sugar!).
- Add some hot water - the amount of water doesn't matter; the ratio of dye to yarn does. Use less Kool-Aid for lighter colors, more for darker colors.
- Stir to dissolve powder.
- Add your yarn to the pan and enough hot water to cover it. (again the amount of water doesn’t matter).
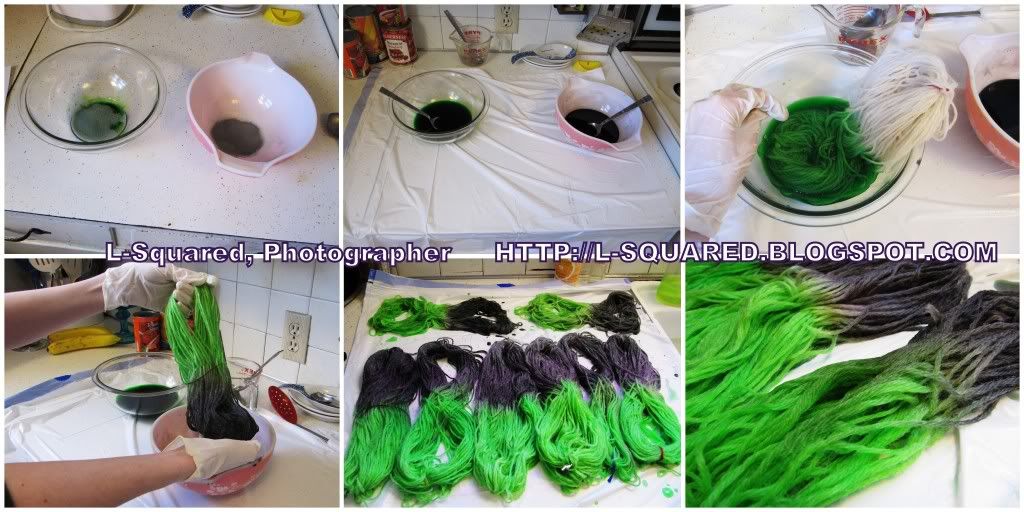
- Use two clean glass bowls (or disposable plastic)
- Empty packages of powdered drink mix of one color/flavor (or your special blend) into each bowl.
- Add at least a few tablespoons of water, per package to the bowls (I used 5 packages in each bowl and about 15 tablespoons of water in each bowl). Again, the amount of water doesn’t really matter, it’s the amount of dye that’s important (the more drink-mix, the darker the colors will be).
- Dip one end of the skein in one color until the color has permeated everywhere.
- Ring out some of excess dye/water mix so it's not running everywhere.
- Then dip the other end of the skein in the other bowl of dye until the color has permeated.
- You can squish the yarn around a little with gloved fingers or a spoon, to make sure it’s all covered.
- Use a metal spoon to insure the middle section of the skein gets dyed too without the dye in the bowls getting mixed (unless you want the middle of your bundles to show the original yarn color).
- You may have to flip the skein over to make sure all areas on the back side are covered too.
- Lay Skeins out flat on a plastic bag-covered surface.
- Mix each color of powder in it’s own plastic cup with a few tablespoons of water per package. (You still want to use at least one package of Kool-Aid per ounce of yarn no matter how many colors use choose to use - You can use as few as three colors or as many as twelve, but you will want to be careful about contrasting colors running into one another unless gray/brown is what you’re hoping to achieve).
- Use a metal spoon or Suck up some of your dye with a turkey-baster or syringe and squirt it carefully onto the yarn. If a variegated yarn is what you are after, apply the dye in wedges or stripes. If a more subtle, mottled color effect is what you want, pour or squirt the various colors as the spirit moves you.
- Rinse the spoon/baster/syringe between colors (or use a different spoon for each color) to prevent unwanted mixing.
- Depending on how big your skeins are, you might need to turn them over carefully and dye them on the back side, too.
- With rubber/latex gloved-hands or with a big spoon, gently press on the yarn to move the dye through all the layers.
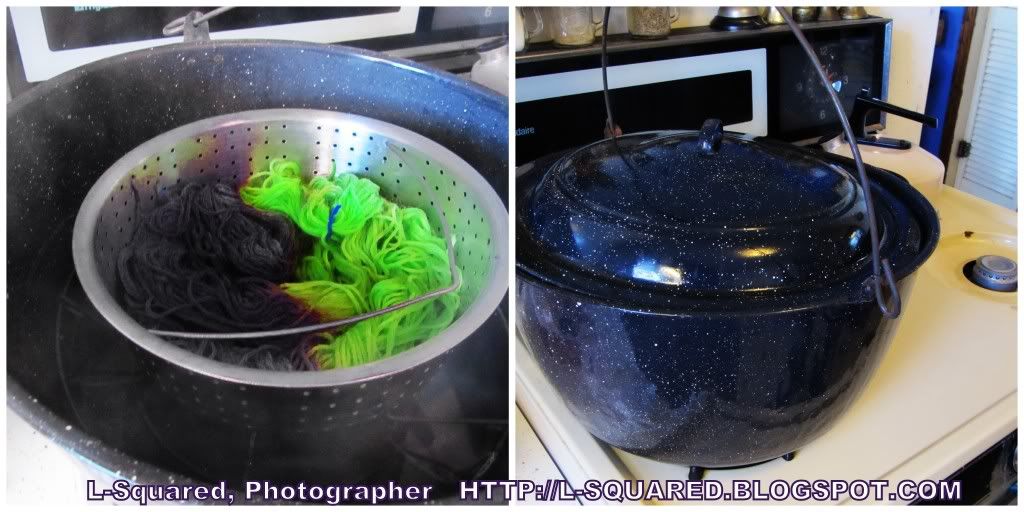
There are two basic methods of setting the dye: stovetop or microwave. I chose to use the stovetop, because from all of my research, this method reportedly yielded better results without running the risk of over-cooking the yarn.
For One Color of Yarn:
- On the Stovetop: Heat the yarn and dye-filled pot to nearly boiling. Turn it off and let it sit, covered, for at least half an hour, stirring a few times, so your yarn doesn’t cook on the bottom of the pot (but be careful not to stir too much or your yarn may felt)
- If You Prefer the Microwave: Heat your yarn and dye-filled dish for two minutes. Let the yarn rest for a few minutes, then heat it again for another two minutes.
- Place the colored skeins in the microwave dish or a steamer basket. (My basket only held 3 of my bundles at a time, so I left the rest sitting on the plastic while these steamed and then repeated the process 2 more times of the remaining yarn.)
- For the Microwave: Microwave as described above (same as for 1 color of yarn, just without the extra water in the dish - be VERY careful not to over-cook the yarn, since it's just in an empty dish).
- Or On the Stovetop: Add hot water to the bottom of your pot (I used a teapot to hurry the heating of water along).
- Place your steamer basket in the pot above the water so it's bathed in the steam from the hot water (but not sitting in the water or the yarn colors will mix).
- Steam for 30-45 minutes over the hot water. (45 minutes was perfect for my yarn.)
- Do not stir (that could cause colors to mix),
- You can turn the burner off and just let it sit, covered, after it's good and steamy. However, check on the pot every 10 minutes or so to make sure it's still very steamy inside. If the steam needs to be replenished, turn on the burner for a couple of minutes, to heat the water in the bottom of the pan up again.
Finishing:
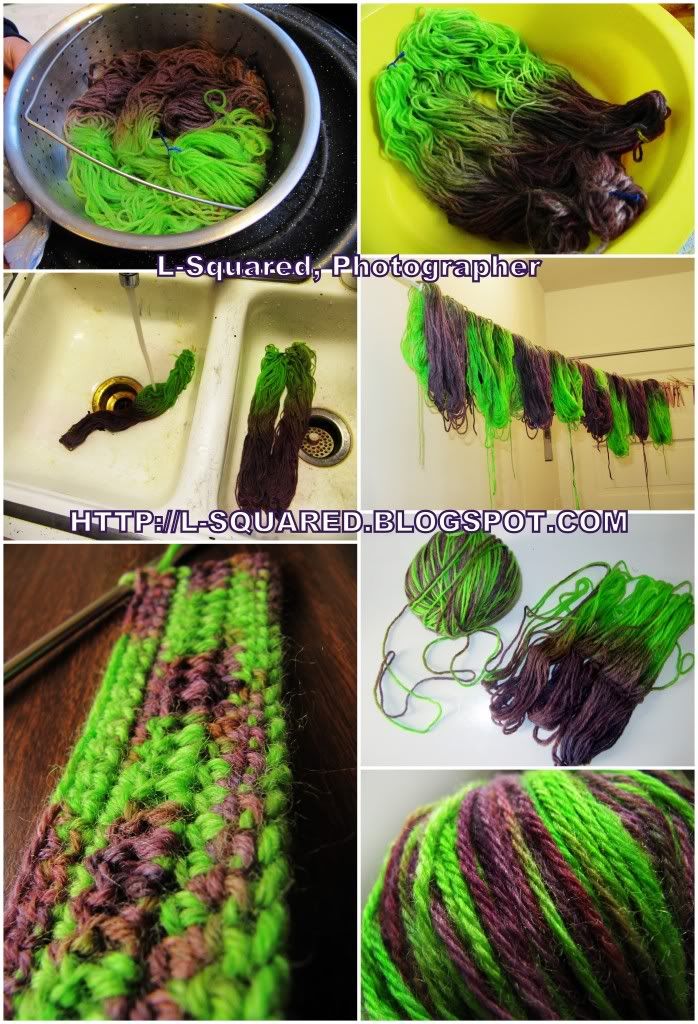
- Once the dye has set, remove yarn from the pot/dish and let it cool.
- Then rinse it thoroughly in luke-warm water (roughly the same temperature as the yarn - shocking warm wool with cold water can cause it to felt).
- Gently wash the yarn in mild soap (again, not too much soap) and rinse thoroughly.
- Hang to dry. (removing the twist ties and spreading bundles out will help them dry faster)
- Roll dried yarn into balls or skeins and enjoy! :-)
Aftercare:
The finished product will be washable (and the fruity smell will fade), just follow the directions for the yarn you've used. If you've washed the yarn thoroughly after dyeing it, you don't have to worry about the colors bleeding in the wash. Just give them the care you would any hand-made item. As is the case with pretty much anything, some fading may occur over time, particularly if it is exposed to a lot of sunlight. However, with care, the bright colors should last for years.
The whole process actually ended up being a lot easier than I thought it would be for me. And, most importantly, I love, love, LOVE how my yarn turned out! I can't wait to start using it for my next crochet project (which I already have picked out). I had so much fun with this, that I might even do it again sometime with more colors and/or other types of dyes. :-)
Verrryy Nice! Have you seen the Kool-Aid yarn color chart? http://www.wrappedrocks.com/koolaiddye.html
ReplyDeleteHow about how to dye self-striping yarn? http://www.streetsandyos.com/archives/2005/06/selfstriping.php
I need to try this Kool-Aid dying thing sometime. It looks like fun!
Yep, the color chart is excellent. I used all lemon-lime for my green and 4 grape + 1 pink lemonade for my purple sections. I thought about making it self-striping (and might do it next time), but for the projects I used my yarn for, the smaller sections of color were fine. It is a lot of fun; I highly recommend trying it! :-)
ReplyDeleteAnother alternative is Wilton Cake Decorating Paste Color. The color palette is so incredibly yummy and the yarn comes out so bright!
ReplyDeleteI've read that works well too (saw it suggested a lot when I was researching yarn dyeing), especially since it colors well with any fiber type. I just went with Kool-Aid for my first try, because it's cheaper and IMO less messy.
ReplyDelete