A while back I saw a post on the Knit Picks blog all about the Baktus Scarf - a unique accessory named after a Norwegian cartoon character. As I scrolled through the photos of many beautiful triangle-shaped scarves, based on a simple concept but often made with intricate colorwork, I realized I wanted to make one too... one with stripes!
I ended up using a size G hook, Crystal Palace Mini Mochi yarn in "Fireworks" and "Equinox" and the idea explained in this Baktus Scarf pattern. Note: For about three seconds I vaguely considered attempting to knit this project, hence why that link goes to a knitting pattern, but then I came to my senses and realized I should just use the same idea to crochet my scarf. I did find a few crocheted Baktus scarf patterns on Ravelry, but ultimately I decided that the knitting pattern from which so many of the awesome Baktus scarves I had fallen in love with were created was simple enough that I could easily convert it to crochet terms and achieve something very similar.
It’s a simple idea really: work in increasing rows until you’ve used exactly half of the yarn (which the pattern designer determined by weighing the yarn) and then work decreasing rows until the other half of the yarn is gone. The idea is so simple, yet a challenging amount of work since it’s small (single crochet) stitching with lots of increases/decreases to keep track of and many yarn changes to create a fun stripe pattern I wanted. If a large amount of yarn was used the project could be a nice shawl, but using just a skein or two (around 100 grams) of sock-weight yarn it yields a great scarf sized project instead.
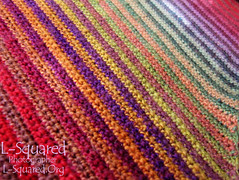
For my Baktus Scarf, I started with 4 chains for 3 sc and then I increased by one stitch every four rows until I reached the halfway point I had marked in my yarn ball. This resulted in 58 stitches at the widest point. Then I decreased one stitch every four rows until I used up the rest of the yarn. This created an approximately 70 inch long scarf that is 9 inches at its widest point and about a half inch wide at its narrowest end points. I alternated the Fireworks and Equinox yarns every other row to make the stripes (using the carrying yarn technique to avoid having millions of ends to weave in).
Unfortunately I had a couple of issues with the yarn I used for this project that at about half-way through were causing me so much frustration I ripped the whole thing out and started over again after making a few adjustments. One issue was that what were supposed to be 50 gram balls didn’t actually weigh that much (one was not quite 47 grams and the other was almost 52 grams). So, obviously, I would have reached the middle of one skein WAY before I reached the middle of the other. Thankfully, I managed to find a bit of leftover sock yarn in my stash that sort of matched with the lighter weight ball of yarn. So, I added it to that ball to help even things out a bit better. However, the other, perhaps bigger issue I had with the Mini Mochi yarn was that one of the skeins of what was supposed to be fingering-weight yarn was spun incredibly unevenly (varying from thread-thin to bulky-thick). This made some of the stitches and stripes look much thinner/smaller or bigger/wider than others. Also, while theoretically the idea of weighing yarn to determine the half way point works great, in practice, when all of the yarn hasn't been spun to exactly the same thickness, going by weight instead of measuring exact length doesn't work so well.
As a result of the uneven yarn strand issue, I am, perhaps, not quite as happy with how the project turned out as I should be. However, I very much enjoyed the general process of creating this colorful project, so I would definitely consider making another one sometime (hopefully next time with more consistently spun yarn). It proved to be a great project to work on while traveling back and forth to my far-away eye surgeon - much less to carry/keep track of than all the various parts and pieces required for my ongoing Lots of Dots project.
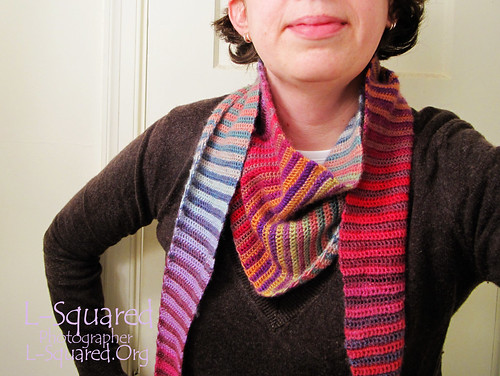
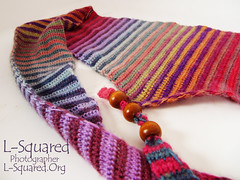
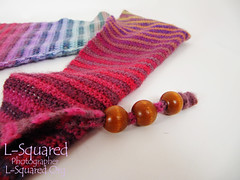
In looking through finished project photos on Ravelry, I noticed many people had added small embellishments to their Baktus scarves like tassels or fringe. I'm not the biggest fan of using tassels/fringe on projects, because in my experience they tend to tangle/mat or otherwise not fare well when washed. But I did come across some nice, simple polished wooden beads that I decided to add to the two narrow ends of the scarf. In addition to giving the scarf a bit fancier finished look, they also give these ends a bit more weight to help keep the scarf in place, since it is usually worn with the widest/heaviest part of the triangle hanging down on the chest like a bandanna and the two narrow beaded ends are wrapped back around the neck and hung over the front of the shoulders.

Your scarf is gorgeous!!
ReplyDelete